Amigurumi Little Mouse Free Crochet Pattern
Hi there…
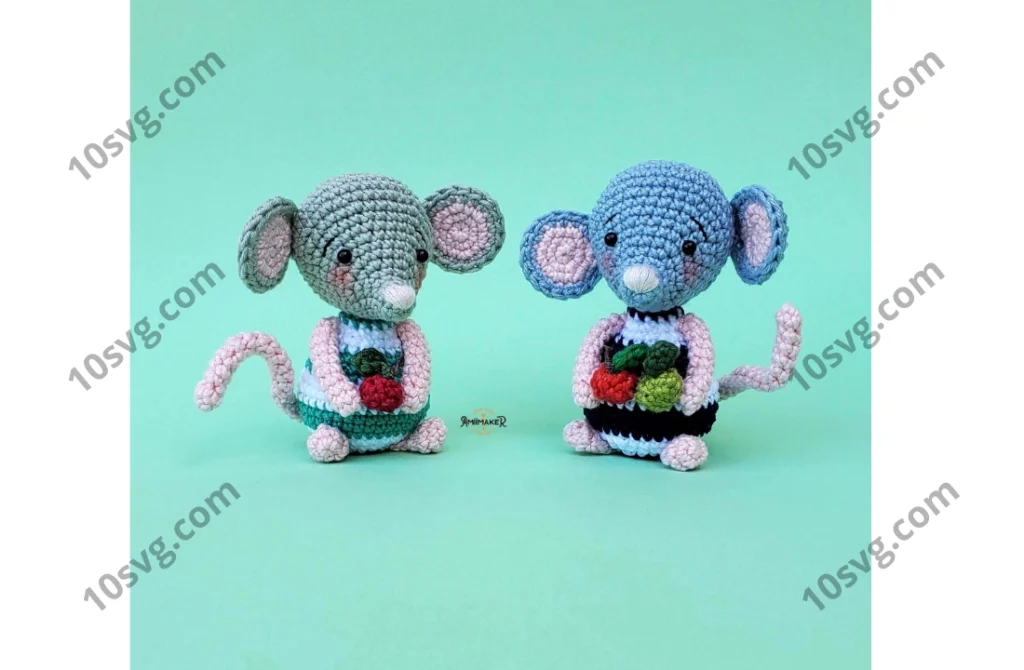
One of the free amigurumi crochet patterns we will share today is the amigurumi mouse, whose photos and design belong to Marina Dessotti (@amiimaker). You can learn how to crochet this little mouse using the free amigurumi pattern. Thanks to Marina Dessotti for this cute mouse.
If you don’t know how to crochet often and use needles, read our shares. Start your knitting according to the rate you have based on the shape you want to make. Shape your toy by increasing and decreasing the stitches. Once you weave the shape, fill the inside of your toy and look at the pictures to decorate.
Materials
- Yarn in six different colors
- Crochet hook according to the yarn weight you are using (I used a 2.75 mm)
- Stitch markers
- Pins
- Stuffing
- Scissors
- Tapestry needle
- Embroidery floss in black and pink
- Micro eyes or beads
- Hot glue and hot glue gun (or any other glue that works for fabrics)
- Thin wire for the tail (optional – approx. 12”/30cm)
- Blush (for makeup)
- Small brush (for makeup) or cotton swab
Abbreviations
- inc – increase
- dec – invisible decrease
- ch – chain
- sl st – slip stitch
- sc – single crochet
- mr – magic ring
- dc – double crochet
- hdc – half double crochet
- BLO – back loop only
- ( ) total number of stitches at the end of each round
With the materials I used, my Little Mouse was approximately 4”/10 cm.
Notes:
Body, head, limbs, and apples are worked in rounds. Use a stitch marker at the end of each round.
About the hot glue/fabric glue use: since this amigurumi is a small piece that will be used as an ornament, I recommend using hot glue or fabric glue at some parts to make our work easier and to use a thin wire to shape the tail. But remember to be careful when using glue. Too much can make a mess, and we’d like to have a neat amigurumi. Be careful using the wire, covering its tips. If you are making this cutie as a gift for a child, it is recommended to sew all the parts and not use the wire.
AMIGURUMI MOUSE FREE PATTERN
Head
Use the color chosen to crochet the head.
Stuff it very well while crocheting until the end. Remember, the shape of the head comes only after it’s well stuffed.
1) 4 sc in the mr (4)
2) [1 sc, 1 inc] x2 (6)
3) 1 sc, 2 inc, 3 sc (8)
4) 2 sc, 1 inc, 1 sc, 1 inc, 3 sc (10)
5) 3 sc, 1 inc, 2 sc, 1 inc, 3 sc (12)
6) 2 sc, 1 inc, [1 sc, 1 inc] x3, 3 sc (16)
7) 3 sc, 3 inc, 4 sc, 3 inc, 3 sc (22)
8) sc around (22)
9) 6 sc, 1 inc, 1 sc, 1 inc, 3 sc, 1 inc, 1 sc, 1 inc, 7 sc (26)
10) sc around (26)
11) 8 sc, 1 inc, 1 sc, 1 inc, 6 sc, 1 inc, 1 sc, 1 inc, 6 sc (30)
12) [4 sc, 1 inc] x6 (36)
13) [5 sc, 1 inc] x6 (42)
Using the tapestry needle and the pink embroidery thread, embroider the snout on the tip that was created at the beginning of the head. The embroidery should start in the magic ring little hole and end two rounds above (between rounds 2 and 3), creating a triangular shape. Place or sew the eyes between rounds 8 and 9, with 9 stitches between them (these 9 stitches should be counted on round 9). Ensure they are centered with the snout. Keep stuffing the head, taking care to fill up the tip of the snout without deforming it.
14 and 15) sc around (42)
16) [5 sc, 1 dec] x6 (36)
17) [4 sc, 1 dec] x6 (30)
18) [3 sc, 1 dec] x6 (24)
19) [2 sc, 1 dec] x6 (18)
20) [1 sc, 1 dec] x6 (12)
21) [1 sc, 1 dec] x4 (8)
Close the hole and fasten off.
Using the tapestry needle and the black embroidery thread, embroider the eyebrows above the eyes, between rows 10 and 11. Add some makeup for cheeks below the eyes.