
Amigurumi Knitted Bunny Free Pattern
This delightful crochet pattern lets you create an adorable bunny that can be customized as a boy or girl! The pattern is suitable for intermediate crocheters and works up beautifully with cotton or acrylic yarn. Below you’ll find all the steps to create this cute bunny, which includes a skirt for the girl version and other charming details.
Materials & Tools:
- Yarn: YarnArt Jeans (3 colors: body color, accent color for the dress, and head)
- Hook: 2.0 mm crochet hook
- Eyes: 8 mm safety eyes
- Mouliné thread for embroidery (for the muzzle)
- Stuffing (fiberfill)
- Stitch markers (optional)
Symbols:
- KA – Magic ring (amigurumi ring)
- RLS – Single crochet
- PRIB – Increase (2 sc in the same stitch)
- UB – Decrease (single crochet 2 together)
- SS – Slip stitch
- VP – Chain stitch
- SSN – Double crochet
Ears (Make 2):
- 6 RLS in KA (6)
- (PRIB, 2 RLS) * 2 (8)
- (PRIB, 3 RLS) * 2 (10)
- (PRIB, 4 RLS) * 2 (12)
- (PRIB, 5 RLS) * 2 (14)
- (PRIB, 6 RLS) * 2 (16)
7-11. 16 RLS (16) (5 rounds) - (UB, 6 RLS) * 2 (14)
- (UB, 5 RLS) * 2 (12)
- (UB, 4 RLS) * 2 (10)
- (UB, 3 RLS) * 2 (8)
- Do not close the ears and do not stuff them.
Head/Torso/Legs:
For a boy bunny: Follow the instructions as provided. For a girl bunny: When crocheting the torso, work the 45th and 47th rows of the body in the back loops only (BLO).
Head:
- 6 sc in KA (6)
- 6 inc (12)
- (inc, 1 sc) * 6 (18)
- (inc, 2 sc) * 6 (24)
- (inc, 3 sc) * 6 (30)
- (inc, 4 sc) * 6 (36)
- (inc, 5 sc) * 6 (42)
- (inc, 6 sc) * 6 (48)
- (inc, 7 sc) * 6 (54)
10-20. 54 RLS (54) (10 rounds) - (UB, 7 sc) * 6 (48)
- (UB, 6 sc) * 6 (42)
- (UB, 5 sc) * 6 (36)
- (UB, 4 sc) * 6 (30)
- (UB, 3 sc) * 6 (24)
- (UB, 2 sc) * 6 (18)
- 18 RLS (18) (neck)
- (PRIB, 2 sc) * 6 (24)
- Change yarn to blue.
- (PRIB, 3 sc) * 6 (30)
- 30 RLS (30)
- (PRIB, 4 sc) * 6 (36)
- 36 RLS (36)
- (PRIB, 5 sc) * 6 (42)
- 42 RLS (42)
- (PRIB, 6 sc) * 6 (48)
- 48 RLS (48)
- 18 RLS, PRIB, 7 RLS, PRIB, 21 RLS (50)
38-51. 50 RLS (50) (14 rounds) - 21 RLS, UB, 7 RLS, UB, 18 RLS (48)
- (UB, 6 RLS) * 6 (42)
- Stuff the head and torso as you go.
- 41 RLS (41)
- Divide the work to form the legs by counting 16 sc to the right from the hook and joining the 42nd and 17th stitches together.
Right Leg:
- Knit 16 RLS in a circle. Join 17th RLS to the loop where the body walls meet (17)
2-20. 17 RLS (17)
- Change color to head color:
21-23. 17 RLS (17)
- (1 sc, UB) * 6, then 6 UB
- Stuff the leg as you knit and close with a needle.
Left Leg:
- Attach the blue yarn to the first sc in the hole of the second leg and repeat the process for the right leg.
Upper Paws (Make 2):
- 6 RLS in KA (6)
- (1 sc, 5 PRIB) (11)
3-19. 11 RLS (11)
- Change color to blue:
20-22. 11 RLS (11)
- (5 UB, SS)
- Stuff as you go and close the part with a needle.
Skirt (For Girl Bunny):
- Work the skirt after the toy is finished. It’s better to add the skirt after completing the body, attaching the thread to the 45th row, and working in front loops only.
- Attach yarn to the 45th row of the body and crochet for the front walls of each stitch:
- 50 chain stitches, then in each front stitch of the body, crochet 2 CCH (100).
- (PRIB, 1 CCH) * 50 (150) — Finish off and secure the thread inside.
- Attach yarn to the 47th row, and crochet for the front walls of the body:
- 50 chain stitches, then in each front stitch, crochet 2 CCH (100).
- (PRIB, 2 CCH) * 33, PRIB (134)
- 134 CCH (134) — Finish off and secure the thread.
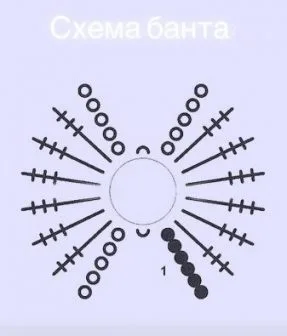
Bow:
You can use the remaining yarn to create a cute bow for the bunny’s head or around the waist.
Assembly:
- Sew the ears to the top of the head.
- Attach the head to the torso.
- Sew the paws to the body.
- Sew on the eyes and embroider the muzzle.
- If making the girl bunny, add the skirt and bow for extra charm.
Enjoy creating your Amigurumi Knitted Bunny! Whether it’s a bunny boy or bunny girl, this crochet pattern is sure to be a fun project and a cute addition to your collection.